One thing I’ve learned over the years is that everyone has at least one fairly strange obsession. And if you’ve ever looked at my hands, then you know that mine is nail art. Yes, much like a 10-year-old girl, my heart gets all twitter-pated thinking about creating itty-bitty intricate designs on those 10 little canvases. I scour nail art blogs like it’s going out of style, looking for inspiration and tips for transforming my talons. Most of these nail bloggers create wonderfully helpful tutorial videos for people like me, and I’m always left thinking, “Hey, I should make one of those someday!” Well folks, “someday” has arrived, thanks to the MMLC’s latest purchase for students in our supported classes – the smartphone rig kit.
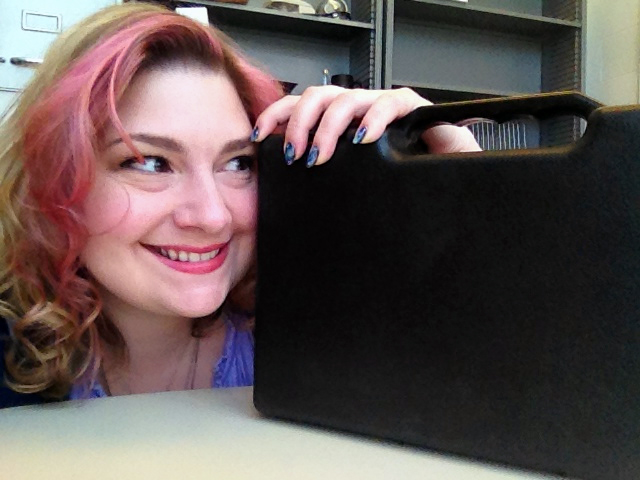
What treasures await me in this sleek black case?
Nowadays, almost everyone has a phone with a built-in camera, so who wants to lug around a separate camera to film videos and whatnot? A silly person, that’s who! (No offense to silly people – I, myself, am one) Of course, the phone’s video functions are rather limited when it comes to things like lighting, audio, and stabilization, but this is the 21st century! There are now a multitude of options available for the novice filmmaker, and Cecile has tapped into her vast wealth of knowledge to compile a complete smartphone rig kit for video. I must say, this thing is pretty awesome.
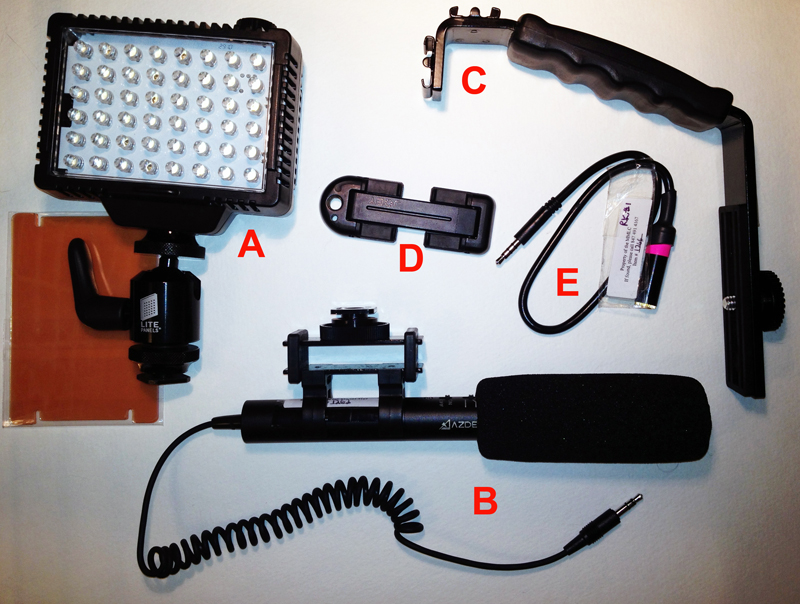
All housed within one handy dandy case, these camera accessories include:
A – A LitePanel Micro LED lighting panel (with color filters to match other lights in the room, if you’re using them)
B – An Azden SMX-10 1/8″ Shotgun Microphone (with windscreen and shock mount)
C – An L-Bracket Handgrip with 2 hot shoes and standard tripod screw
D – A Joby Smart Phone Grip Tight Tripod Mount
E – An adapter for iDevices to use with the microphone (see B above)
Put them all together, and what do you get? A mini filming studio in your hot little hand! The microphone, light panel, and phone mount can all be screwed onto the L-shaped handgrip, and then it’s a simple matter of mounting your phone and pressing record. You can also attach the rig to a tripod, or a separate dolly (also available in the MMLC lab) to the whole shebang. This is basically a little skateboard-esque platform, which you can roll across any surface to steady your hand and make the video smoother.
When they’re all set up and working together, they look a little bit like this:
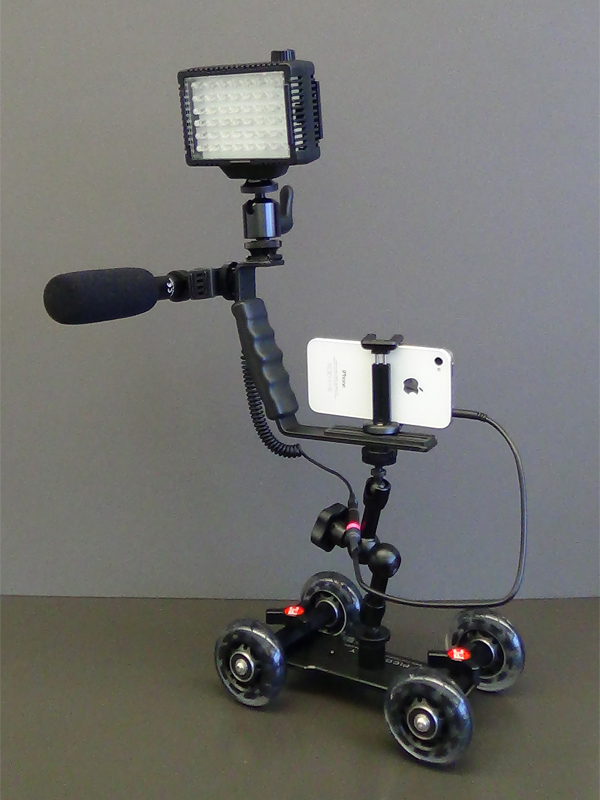
Am I the only one who thinks this looks like Johnny 5 from the 80’s classic Short Circuit?
These pieces can be used all at once or one-by-one to achieve the smartphone movie of your dreams! The light panel has a built-in dimmer switch and various filter attachments, so you can customize the light levels to meet your needs. The microphone just plugs right into the headphone jack on your smartphone, but many devices will also need the included adapter (item E above) to work properly. These items can be used with the dolly (perfect for those fancy smooth panning shots) or with a tripod (perfect for those fancy smooth staying-still shots).
I should also mention that if you feel weird or uncomfortable using your smartphone to film your video, this rig kit is compatible with most regular cameras, so you can get in on the fun too!
“But Sarah,” I hear you lamenting, “what can you actually MAKE with this crazy equipment?” Remember that nail art tutorial I mentioned earlier? Yup. I couldn’t resist.
http://youtu.be/H6jgG_McONI
Since I wanted to show a steady, close-up shot of my hands, I needed to set up my camera facing straight down and lying on a fixed platform. I decided to build my own little rudimentary “light box” using a cardboard box and a panel from a wire shelving unit. I then used the light panel, microphone, and mic adapter to improve the audio and video (I walk through this whole set-up at the beginning of the video). The LEDs on the light can get very bright, but they can also be dimmed down to a very low level, if you want to have some mood lighting. I found the microphone cleaned up the audio nicely – for instance, my plosive consonants (P, T, K) were less “explosive”, which was the most noticeable improvement to me. You’ll hear halfway through the video that I accidentally unplugged the microphone from the phone, and there’s a definite difference in quality. However, I thought this was one of those happy teachable mistakes, so I kept it in.
After I filmed a gratuitous amount of nail painting, I downloaded it all from my phone into iMovie (installed on all of the MMLC lab computers). I gotta say, this program is a blast! There are so many easy ways of taking all of your rough jumbled clips and creating a lovely cohesive video, complete with sound effects, background music, titles and credits, interesting transitions and more! All of my MMLC cohorts can attest – I was quite giddy the day I spent editing my little video. It’s so much fun, I’m considering leading a workshop about it sometime in the near future (comment or email me at sklusak@northwestern.edu if you would be interested!). Once I finalized my video, it was a simple matter of uploading it to YouTube and sharing it with the masses.
Lessons Learned
As with every new learning experience, there were some trials and tribulations that probably could have been avoided. I learned these lessons the hard way so you don’t have to!
- There’s no such thing as recording too much video. Once I started editing everything together, I realized the importance of having a lot of clip options to work with.
- If you want to try your hand at making a light box of your own, I recommend making the interior walls white with paper or paint. The light will bounce off of the stark surface and improve the overall quality.
- Use a tripod! While my light box rig worked fairly well for my purposes, I noticed after the fact that the video was shaking a bit, probably because I was unknowingly brushing against the “walls” of my box. Next time, I’ll use a tripod instead, with a bigger box, or even just a flat white surface without walls.
- Make sure the lens of your camera is clean. A hazy picture might work well for Barbara Walters, but it just looks odd in almost every other scenario.
- Double- and triple-check that the mic is plugged in and turned on before filming! It’s quite frustrating to have to re-film a “scene” just because the mic is turned off.
- Along those lines, periodically review the clips that you’ve filmed to make sure everything looks and sounds right. It’s better to catch an error quickly (like an unplugged mic), than to tape ALL of your scenes and then have to start over from scratch.
- If you think editing your video will take a minimal amount of time, think again! I spent many hours cutting, adjusting, and reorganizing my 9 minute video. But if you’re like me, you’ll probably be enjoying yourself too much to really notice.
So there you have it! If you have video project ideas that you’d love for your students to create for class and weren’t sure if they could do it, I highly recommend you hop on over to the MMLC lab desk and check out this awesome rig kit yourself. What have you got to lose? You might find that it’s more fun than you thought it would be – I sure did!
— Cecile-Anne Sison contributed to this article